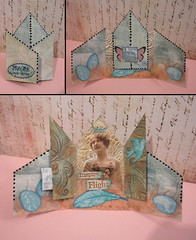
Inspire Flight ATC


Inspire Flight ATC
Originally uploaded by saunjune

This ATC was made for our Open House Triptych swap at North Coast Art Swaps.  This one probably took the most time, I think it was because I couldn't really decide what I wanted to do.  The background paper started out as some leftover serendipity paper I had made for a swap about a year ago.  Most of the stamped images are from Stampington Company, some are also from Inkadinkado.  I think I found the lady image in the free collage images at art-e-zine.  I have uploaded the triptych templates that we used to North Coast Art Swaps, or you can download the PDF here.

Comments

CBH said…
Thank you so much for this post. I want to let you know that I posted a link to your blog in Creative Busy Hands Cricut Freebies Search List, under the Card post on Apr. 02, 2010. Thanks again.
CraftCrave said…
Just a quick note to let you know that a link to this post will be placed on CraftCrave in the Cutting category today [07 Apr 02:00pm GMT]. Thanks, Maria
Classroomfree said…
Wow, gorgeous, just utterly gorgeous!

Popular posts from this blog

Sweet Birdie Borderless Shaker Card

W e are shaking it up for the month of May with  this sweet little birdie card!  Create a borderless shaker card featuring Marlene's Sweet Birdie stamps and a beautifully blended Oxide ink background! This is a fun and different way to create a shaker card that doesn't require the use of dimensional foam tape. There are links to the video tutorial and PDF instructions below. Hope you enjoy making this sweet birdie card yourself! Supplies Used: Cardstock and Acetate Sweet Birdie by Marlene stamp set Sentimental Flowers by Simon Hurley Stamp set Black Archival ink Oxide inks in: Picked Raspberry, Spun Sugar, Speckled Egg, Stormy Sky, Chipped Sapphire Domed Foam Ink Blenders Assorted Water Based Markers Water Brush Scrappy Tape Bone Folder Tape Runner Scissors Faber-Castell Metallic Highlighters PDF Tutorial  Here

Out of the box

I just got home from teaching to an amazing group of ladies!  The class was so much fun I decided not only to blog about it but share the instructions as well!  Here is a tutorial for making a Steampunk inspired cigar box!  It is part of a series of classes I am teaching in tandem with Sondra K. called Cheaper than Therapy.  Spending an evening in a room filled with fun and creative people is theraputic indeed.  Well, on with the tutorial! Out of the Box In this class we created a paper covered foam frame to top a paper covered cigar box.  We used Graphic45 papers, Tim Holtz gear die cuts, and lots of fun industrial looking embellishments! Basics that you will need: A cigar box or paper mache box Paper trimmer Scissors Ruler PVA glue Glossy Accents glue 3-d foam dots or tape Foam-core board cut into 1.5 inch strips Cardstock Fun embellishments (gears, brads, bling, etc) Frame This First measure the top...