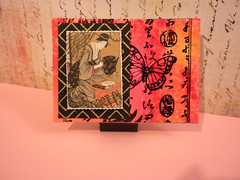
Geisha faux postage ATC


Geisha faux postage
Originally uploaded by saunjune

I made most of this card sometime ago.  It is the second card I am sending Jennifer!  The background was made by inking the inside of a plastic folder, a few drips from 2 - 3 different colors, then squishing a glossy sheet of paper between the inked up folder.  I will try to make a tutorial to explain that better.  (I just have to find some time first...lol).  It was then stamped w/ Staz-on ink in black, I think I used a Hero Arts stamp, but I could be wrong.  And I really don't want to dig through my cache of rubber stamps right now to find out.  :)  I stamped over the geisha image with postal themed stamps, then mounted the image to some fancy hand screened, yummy, fiber-y paper.  Tah-da!

Comments

Popular posts from this blog

Cricut "love note" post it holder

Here are the directions for the Love note post it holder I made with my Cricut. I taught a small class at Scrappers Edge featuring this project! Ingredients : Cricut or Expression Machine Fabulous Finds cartridge Jasmine Cartridge Cricut Tools spatula Patterned cardstock (Cosmo Cricket "love notes" ) Bazzil cardstock Ink Jet Transparency sheet Ribbon Alcohol Inks (Wild plum, Stream, Copper mixative) Chalk Ink Cat Eyes (Wisteria, Chestnut Roan, Warm Red) PVA glue Glossy Accents glue Scissors Ruler Directions : The first cartridge you need is Fabulous Finds. You will need to set your machine to cut at 2 ¼ inch with the pressure at high, and the blade depth set at 5 or 6 depending on the thickness of the cardstock. Set your cutting speed at medium. The design is called , it is on the bottom row and you will need to use the shift key to select it. Load your printed cardstock on the mat and begin cutting! (Use the chalk ink to distress the edges). Next you ...

Coolest sidewalk chalk...EVER!!

I found these guys in the toy section at the Tuesday Morning store.  Aren't they the best!