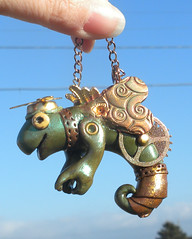
Ooooh! Steampunk


steampunk chameleon 3
Originally uploaded by saunjune


I got this very nifty book for Christmas called Steampunkery....well here is the result of my first attempt at making a steam-punk chameleon fairy lizard guy. I like it! This little guy is a birthday gift for a friend. Polymer clay, gears, glazes, and mica powder, topped with a cool propeller hat.

Comments

Furman said…
Like the color choices and the shape of the little creature. Great work.

Popular posts from this blog

Boo! Book and the deep cut blade

Here is the CUT file for the BOO! Book. I used George and Paper Doll Dress Up cartridges. It is bound using the Bind-it-All. I made this project using the Cricut deep cut blade and housing. Wow! What a difference it makes. I was able to cut through really heavy chipboard, I think it was about 1/8 " thick. I had tried to cut through this material using the original blade housing and lots of multi-cutting, but with no success. The deep cut did make it through , but it took some learning. The blade housing has 11 depth settings rather than the usual 6. The numbers still say 1 - 6, but you can set it half way between the numbers also. Which means I had to figure out new pressure/blade depth settings. (I feel like I just finally got a handle on the old settings, LOL) I wish I could say it just sliced through like butter on the first try, but it didn't. My first cut came out terrible, I set the pressure at maximum and the blade depth at 6, and the machine stuttered, and...

Cricut "love note" post it holder

Here are the directions for the Love note post it holder I made with my Cricut. I taught a small class at Scrappers Edge featuring this project! Ingredients : Cricut or Expression Machine Fabulous Finds cartridge Jasmine Cartridge Cricut Tools spatula Patterned cardstock (Cosmo Cricket "love notes" ) Bazzil cardstock Ink Jet Transparency sheet Ribbon Alcohol Inks (Wild plum, Stream, Copper mixative) Chalk Ink Cat Eyes (Wisteria, Chestnut Roan, Warm Red) PVA glue Glossy Accents glue Scissors Ruler Directions : The first cartridge you need is Fabulous Finds. You will need to set your machine to cut at 2 ¼ inch with the pressure at high, and the blade depth set at 5 or 6 depending on the thickness of the cardstock. Set your cutting speed at medium. The design is called , it is on the bottom row and you will need to use the shift key to select it. Load your printed cardstock on the mat and begin cutting! (Use the chalk ink to distress the edges). Next you ...