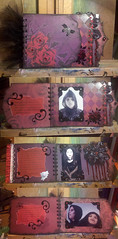
vampire book


vampire book
Originally uploaded by saunjune

This is a vampire themed chipboard mini book I taught at Scrappers Edge last night. We used the bind-it-all to assemble the book and Tim Holtz On the Edge dies to create the shaped edges. The drippy blood is drips of Glimmer Glam paint. I printed vampire quotes onto red vellum and embellished with velvet paper swirl punches, velvet photo corners, lace and lots of bling! It was a fiendishly good time! (The scary little kids are mine, dressed up for halloween 2 years ago).

Comments

Raven said…
LOVE the Vampire book, and I can't wait to take some pictures of my own little blood sucker to add to the pages.

Thanks so much!

Popular posts from this blog

Beeswax canvas

 Here are a couple of mixed media sealed with beeswax canvases I made as some birthday gifts for friends.  I have neglected to post about them for over a month.  The kitty canvas was for a 12 year old girl who loves cats, and the "She who would fly" canvas for her 18 year old sister. I used newsprint gift wrap (found in the dollar section at Target) for the background of the kitty canvas.  It is all beeswax, with napkins, clip art from Lisa's altered art , and a bit of doily.  Oh, and some cool tinsel ribbon.  The "Fly" canvas started out as a mixed media piece with lots of paint and ink.  I also collaged on some napkin bits, clip art from Lisa's altered art and sewing pattern tissue.  The dragonfly stamp is from Stampers Anonymous Classics #1 set.

Boo! Book and the deep cut blade

Here is the CUT file for the BOO! Book. I used George and Paper Doll Dress Up cartridges. It is bound using the Bind-it-All. I made this project using the Cricut deep cut blade and housing. Wow! What a difference it makes. I was able to cut through really heavy chipboard, I think it was about 1/8 " thick. I had tried to cut through this material using the original blade housing and lots of multi-cutting, but with no success. The deep cut did make it through , but it took some learning. The blade housing has 11 depth settings rather than the usual 6. The numbers still say 1 - 6, but you can set it half way between the numbers also. Which means I had to figure out new pressure/blade depth settings. (I feel like I just finally got a handle on the old settings, LOL) I wish I could say it just sliced through like butter on the first try, but it didn't. My first cut came out terrible, I set the pressure at maximum and the blade depth at 6, and the machine stuttered, and...